Monthly Obsession: Pompom Sandals

It must be the thick of summer because I'm starting to obsess over Gray Malin beach photos, iced coffee, and the smell of sunscreen. I got my first sunburn of the season last weekend, and I can still feel a tiny crinkling burn whenever I shrug my shoulders. (Shame on me, no sunscreen! Eep!) To be honest, summer kind of snuck up on me. What is it about entering the workforce that totally messes with your brain and the seasons? I mean, srsly. June just slips on by as yet another month, and it's not until 4th ofJuly that the "ah! It's summer!" smacks you upside the head. (#adulting)   

So, my newest obsession for the summer is the pompom sandal. I passed by them at Anthro and it was like my head was yanked away from my body when I spotted them. Laying on the shelf, they looked kinda like a pathetic deflated party balloon... or like the inside of Cheech's Love Machine had been put through a neon-colored blender, and I was fascinated. I kinda hate myself for it, but I'm strangely attracted to them. They're like a wacky Carmen Miranda fiesta for your feet. Did I buy them? No. But, they are still haunting me. For two months. They've been haunting me. 

Mystique Tokyo Sandals, Anthropologie

Mystique Tokyo Sandals, Anthropologie

I've started seeing them pop up all over the place. In stores, on Instagram... I don't think I've actually seen anyone wearing them out in public, but then again I did not go to Cochella, so they could be EVERYWHERE and I don't know it. I've been living in a little bubble for about 6 months, so there. A quick insta-search reveals that with 5,800+ tags, yes, #pompomsandals, they are everywhere. The more I scroll, the more people start to look something like utterly ludicrous Decorator Crabs grabbing bright, shiny balls and sticking them onto their feet.

I know, I keep talking about how ridiculous they are, but that's just it, I keep talking about them. *cue big sigh* Lets be honest here, I LOVE how ridiculous they are. I'd love to wear them with white jeans and a linen top. No jewelry. Why bother, because you know everyone's just going to be staring at your feet. So I may just have to give in to the absurd and snap them up before summer is gone. Here are a few that I've found:

sandals.jpg

1: WhatFrankieDidNext Pompom sandals,. 2: Elina Linardaki Penny Lane Sandals, 3: Good Night Macaroon pom pom lace-ups, 4: Greek Sundals Small pom pom lace-ups, 5: TrendyTopUk Haldidi tufted sandals.

Monthly Obsession: Eau de Summer

September is almost over and summer is winding down. Here in LA we're still getting steamy 100 degree days, so it doesn't really feel like fall. At all. As a result, I still have summer on the brain and one of my favorite things is the smell of summer. I love the smell of sandy salt air, jasmine and plumeria hot from the afternoon sun, and the tinge of fresh coconut. Surfers' Sex Wax and Sticky Bumps, and getting slathered up with Hawaiian Tropic and Banana Boat. It's that smell when you've just come out of the ocean and you're laying face-down on a towel, the wind brushes over your shoulder while you examine the microscopic kernels of sand inches from your face. You smell all of that, minutes before you fall asleep with the sun on your back.

When I was living in New York, I kind of made it my mission to find this smell... if only to remember the California summers of my childhood. I was extremely picky because, like my mother, I have an extremely sensitive sense of smell. I'm the type of person who sneezes in the detergent aisle or the perfume department because of the general onslaught of odors, good or bad. I have an aversion to any sort of artificial smell, like fake coconut or scratch-n-sniff stickers.  To replicate my summer smell, I wanted the "real" thing, or as close to it as I could get.

From my searchings, here are a few of my favorite items that, to this day, I am totally obsessed with:

clockwise from top left:

Kai perfume OilWhite Sand body lotion, Finn & Co; Monoï Body Glow, NARS; At The Beach 1966, CB I Hate Perfume; Aloha Orchid, Capri Blue.

Project Adventure: Remembering Africa

It's been about a year and a half since Mom and I went on our once-in-a-lifetime trip through Africa. Sometimes I think about it and it feels like we just came home last week, other times it feels like a surreal dream from a million years ago. So many different places, so many different cultures & traditions. 

We visited: Morocco, Western Sahara, Senegal, The Gambia (yes, they really put "The" in there), Sierra Leone, Ghana, and Kenya.

People ask me which, of all the countries we visited was my favorite? Honestly, all of them were my favorite. There were so many amazing things (and many not so amazing things) about each place that they are, truly special in their own way. It may sound cheesy, but it's the truth.

I'd love to go back to those places and visit more, for a longer period of time - but then I think of all the other amazing countries in Africa that I haven't seen, and my internal travel bug goes pitter-pat. What fun would it be to see more of the incredible continent that is Africa! Wish I could live to 200 years old and win the lottery every year so I could keep going back again and again.

This world is just incredible. Go out exploring!

All photos in this post are my own. Please do not use without my express written permission.

Accessorize: Tassles

One thing I've seen popping up around the interwebs at an alarming rate is tassels. All over the place! I'm a fan of less is more in this instance. It would be way too easy to go overboard on these and end up in the realm of crazed cheerleader. Where there was a stone, pendant or charm on a necklace, add a single tassel. I enjoy myself a tassel here and there, but I'm wondering if this will be a flash in the pan or will is actually stick around for awhile and we'll be sick of them in another year? 

Regardless, get 'em while they're hot! I've rounded up a few interesting ones. Enjoy!

Above photo: Tassel Garland by ConfettiSystem

Project Adventure: Flowers with DLF + Moon Canyon

This Saturday my sis-in-law and I attended a super fun flower arranging workshop by Kristen of Moon Canyon hosted by the lovely Bri of DesignLoveFest. It was held at The Unique Space in the Arts District near downtown LA. Such an amazing space. It's full of office/studio/event spaces, each one of them decorated with beauty, style and lots of personality. I highly recommend checking it out if you ever get the opportunity. Seriously awesome instagramming ops.  (warning: parking sucks!)

Our day was tons o' fun - Kristen and her team were very helpful and super nice. The inspiration for the class was late summer roadside flowers: soft browns, beiges & creams. It's interesting to see that despite everyone getting the same kind & amount of flowers, the difference between all the final outcomes. It's like everyone has their own flower fingerprint. Hee hee.

This one's mine. I kinda like it. {silly winky-smily face emoji}

Flowers we used: 'Autumn' sunflower, 'cafe au lait' dahlia, amaranth, millet, geranium leaves, chocolate cosmos (that smell just like chocolate!), rudbeckia (although, might have been helianthus), plains coreopsis, raspberry, white clover, ranunculus and silver explosion grass. Everyone's gotta check out the dlfworkshops - I've got my eye on the calligraphy class! 

PS. Check out The Unique Space's amaze-balls bathroom that I'm totally swooning over. Check out the Apartment Therapy tour of the space with it's creator and decorator, Sonja Rsaula and be prepared to turn green with envy.

Mom's Garden: Summer White

Hope everyone is having a great summer so far! 

This massive bunch from Mom's Garden is brought to you by two stunners and personal favorites of mine, Oak Leaf Hydrangea and rose 'French Lace'.  

Hope you enjoy!

Flowers in this group include: Oak-leaf hydrangea, Mophead hydrangea, David Austen rose 'French Lace', Hellebore, Columbine, Achillea Milefolium (Yarrow)

...and a couple more that we don't know the name or how they popped up in the garden... hee hee!

Project Renovation: Before & After - Master Bath

...drum roll, please!....

I present, my master bath before:

A word about the before. I really loved this bathroom. Like, really loved. I wanted to keep everything and just spruce it up a bit with new paint & wainscoting, but when it came down to the renovation of the rest of house, it was obvious several things had to happen. It was almost like a domino-effect {another reason to fully plan out ALL your renovations before work starts so you don't have crazy change-orders. Contractors love & hate change orders. They make more money on them, but it usually involves more time and effort. Both are bad things for the holder of the checkbook}. I'm guessing the house only had one bathroom when it was built. Naturally, the bathroom had it's door in the hallway so everyone had access. I think the 2nd bath was added some time later, also with access from the hallway. This resulted in 2 bathroom doors about 10 feet from one another. Since I was recapturing kitchen space by moving the hall bath and making it an official "guest bath", it was only logical to close off the door into the back bath and create a Master Bathroom. Hel-lo Master Suite! Woo hoo!

(PS. Don't you just love the old yellow walls with pink trim? So groovy... Not.)

--

Because of where we were putting the new doorway and the space constraints, I was super sad that the awesome built-in cabinets had to be removed. I was hoping that I'd be able to save and relocate them to the other wall. I was informed after demo {which I kick myself for not being there and helping/supervising} that it was too damaged in the removal process to save. {my totally irrational subconscious was stamping my feet like a 3 year old, screaming "those lazy, oafish demo guys!! They tore it out because they didn't want to take the extra #$*%!* effort to remove it gently!!!!! AAHHHHHH!!!!"
Of course, I have no evidence of this.}

Also, the beautiful porcelain hex tiles had to be ripped out because there was a huge crack in the middle of the floor {I'm assuming from an earthquake or the house settling}. Also with the relocation of toilet, sink and cabinets, there were several holes that would be difficult to match new tiles & grout without looking patchy. I was also hoping to turn the original cast iron tub into a tub-shower - as much as I would love to take baths every day, it's not super practical. Naturally, with creating a shower, I would need a tile surround to prevent water damage & flooding while I took a shower in said tub-shower. Small detail. All said and done, where I thought I'd need minimal work, I ended up with a totally gutted bathroom.

*sigh*

So, work continued while I tried frantically to find tile, a new toilet {I was also planning on keeping the two original toilets, but on closer inspection and some rational thinking, they were both quite gross}, a medicine cabinet, a new sink cabinet, and fixtures to tie it all together into a cohesive unit.

A win for me: I managed to save my original tub. My contractor thought I should get a new tub because the original one had some rust spots around the drain and faucet area. Really not that bad in my opinion... it's just so cute and has a really pretty curve on the sides. I couldn't bear to get rid of it {besides! It's ORIGINAL and CAST IRON. I mean, come-on. Not only that, but a new cast iron tub is at least $1200! I'm not a fan of acrylic tubs. Cheaper yes, but no plastic tubs in my house, thank you very much}. After my insisting, my contractor found a little old man who reglazed it for about $250 and it looks brand-spankin' new. Winning!

So, without further ado, here's my new Master Bath!

Project Renovation: Before & After - Hall Bath

So, yesterday I gave you a little peek into the process of the hall bath. Now, I give you the final results of the hall bathroom! Yay! 
As a refresher, here's the before:

And, here's the after:

 The mirror above the sink is original to the house & relocated from the master bathroom. Lantern pendant is from Morocco. Shelf: Pottery Barn. Sconce: Restoration Hardware. Tile: Fireclay Tile. Pedestal sink & toilet: St. Thomas Creations. Wall paint: Dunn Edwards high-gloss in "Deep Sapphire". 

Project Renovation: Hall Bathroom

With a shiver & a ghastly hiss, I give you.... the Hall Bath...

There is nothing nice I can say about this bathroom. Not only was it taking out a sizable chunk of the kitchen,  the toilet was so large that the door smacked the bowl when you tried to enter. The shower was leaking a steady drip accompanied by a petri dish-like floor growing happily in the dim dampness. The sink was molded fiberglass awesomeness. It was even outfitted with a super stylish light fixture, a la Vegas dressing room.

No question. It had to go.

I'll have to show you a floor plan so you can better understand the maze that was my house.

{Apologies for the horrible scan quality}

 On the left we have an utterly complicated mess. On the right, a clean and simple with flow. Like a breath of fresh air.

So, now you know exactly what's going on, here's what happened in a lightning fast 3 image summary... remember, I was out of town for most of this {and again, leaving town is NOT ADVISED}

Looking back, it's kinda crazy the amount of work that was involved with all this.

All the tile in the bathroom is Fireclay Tile. I loved my tile, but unfortunately it took FOREVER to come in.  Usually it takes around 6 weeks. They make amazing stuff and since everything is handmade there can be inconsistencies. They had to completely remake a portion of my order because the quality wasn't up to their standards. So, that tacked on another 2 weeks. So we waited. Finally, it came in and the installers got to work. They were also nice enough to put up a couple of Ceasarstone shelves in the shower that I had made from scraps of the kitchen countertops.

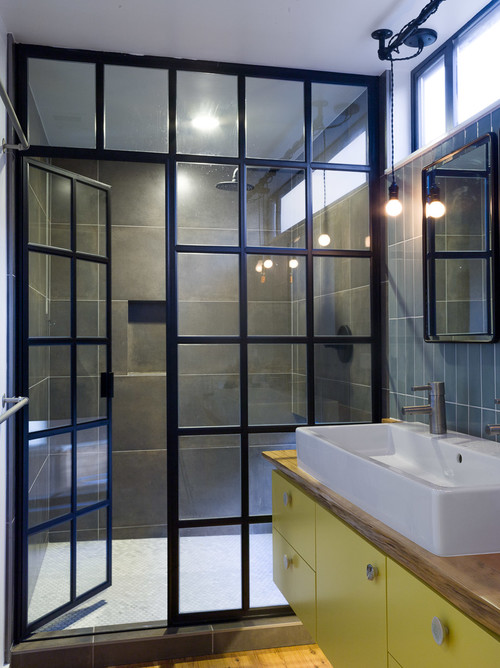
As I've no more mula, dinero, scratch or dough to spend at the moment, there is no shower door. It will be coming later. Because, of course, I have Grand Plans. And naturally, Grand Plans are expensive! Beeeecause, I want this awesomely amazing wonderful style of shower door:

See? Grand Plans. Stay tuned! The final before & after pics of the hall bathroom is coming tomorrow!

If you'd like to see my bathroom inspiration board on Pinterest, here is is.

Accessorize: Geometrics

Geometrics: they're all over the place. This is in no way a "prediction" post of what is to come, but rather a holy-crap-look-it's-everywhere post. What I love most about the geometric craze, is the variations of it all. Everything from triangles and zigzags in home decor to laser cut and 3D-printed clothing. This time I'm talking about the jewelry (and one clutch). Aren't they awesome?!

Project Renovation: Design*Sponge Feature!

 Check it out, everyone! Such exciting news, my house interior was featured on Design*Sponge a couple weeks ago! Many thanks to the super nice Amy Azzarito, Grace Bonney, and all the readers & commenters on the site {and on Instagram} for all the support and lovely words! I've still a lot of decorating & finishing touches to do, and will be adding more detailed posts about the renovation process soon! Renovation been a whirlwind and oftentimes maddening, but one thing's for sure: All said and done, it's all worth it! {my pocketbook may beg to differ, tho}

Check out the full D*S post here

See more of my Project Renovation posts here

Project Renovation: Big Reveal: Kitchen!

If you know me or have been following this blog, you know that my house has been consuming most of my life for the past year-and-a-half.

{gulp}

From the moment I put an offer on it, my life has been a constant roller-coaster of events. I closed on my house the day before Thanksgiving and my contractor started demo the following Monday. A project that he said would take 3 months. "We'll have you moving in here before St. Patrick's Day!" he said. Yeah. Right. I may have gone out of town in a series of crazy, once-in-a-lifetime crazy-to-pass-up type trips: a month in Africa, a week in Hawaii, and 10 days in Cuba. That January through March was just insane. Amazingly awesome, but insane. Mental note for any of you thinking about buying and/or renovating a house. Do NOT go out of town until the process is over.

So, anyway - here is the before of my cute, but awkward kitchen with virtually no counter space.

*cue the drumroll*

I present.... my kitchen!! *ta-daaa* 

{audience ooh-ing and ahh-ing}


Monthly Obsession: Navajo rugs/blankets

This issue of Monthly Obsession is brought to you by Navajo rugs in all their fabulous geometric glory.

As I continue to furnish & decorate my home, I've become increasingly obsessed with Navajo textiles. I mean, come on. They're just incredible. Geometric, colorful (usually) so bold and graphic. I'm just sad that my pocketbook can't afford most of the really unique vintage ones! Sigh.

Traditionally, they are hand loomed by women and take a really long time to create, hence the hefty price tag. Mostly the readily available vintage ones were made around the 1930-1960's. You can find ones from as far back as the mid 1800's! If you're into this style, there are also really amazing Navajo Chief's blankets with really bold stripes and patterns. Horse/Saddle blankets are another, smaller size option. Luckily for those of us who can't spend a bundle on the vintage originals, there are more affordable rug makers that are jumping onto the geometric bandwagon. Here's a few of my recent new and vintage favorites:

Above rug: 1930's Eye Dazzler

Project Honey Bee: Harvesting Honey

When it comes to beekeeping, Mom and I are nowhere near professionals. We have just read, watched & researched a lot (Mom more than I, of course. She's a good researcher). The cool thing is, that we have a living, breathing hive to examine & practice on. We go out to the hive, pull it apart, look around & see what needs doing. Even when you're a novice, some of it comes down to trial & error, and gut feeling. Mom will call me up, "We need to check on the bees this weekend". Okay. One, two, three, go.  

Cool bee fact #237: The vast majority of bees in a hive are female. Females do all the work. The male bees {called drones} sit around getting fat - literally getting fed from female workers - waiting to fly off and mate with a queen. Cue feminist ranting & males everywhere chortling...

When the ladies start filling up the hive with tons 'o extra honey {usually about mid-summer}, it's time to harvest it. One thing about bees is that you always have to give them something to do, otherwise, the hive will get too crowded and they'll leave for bigger/better digs. So, when there is lots of extra honey {stored in a different area than the larvae & food area}, you get to take some for yourself. Then, when there are areas of the hive that are empty, they'll feel the need to fill it up with something {usually, more honey surplus}.

So, our ladies had a nice bunch of surplus honey that we were able to harvest. We cut out chunks and put them in a bucket. Most professional beekeepers have these really awesome centrifuges that are specifically made for extracting honey from the comb. We didn't have anything like that. Some people suggest just cutting the comb into little chunks and letting gravity do all the work. We weren't that patient. So, what's the closest thing to a household-grade centrifuge? A salad spinner, of course!

We'd add a few chunks at a time, spinning slowly - the spinner would stop when the bottom would fill enough to make the basket catch. Then, we'd add it to sterilized jars.... slow going, but super effective. Voilà! Our very own honey! Wee! So exciting. And, it tastes absolutely fantastically delicious. Who wants homemade honey and biscuits?!?! Yes, please!

Project Renovation: Kitchen Floor

Here I'm going to attempt to illustrate the craziness that is my kitchen floor. After pulling up about 3 layers of burlap-backed linoleum & a layer of 90-year old tar/glue, I was left with  beautifully untouched original flooring. If you remember (and much to the horror of my contractor), I had the unwavering desire to paint my floor. *Gasp!* in total incredulity he says, "You want to paint your wood floor?!" Seriously. I don't think this man has EVER picked up a home decor magazine or even knows the word "blog". He even asked me to send him a link that would show how to properly paint wood floors. I obliged, knowing full well he was never going to read it. He's a do-er, not a dreamer. So, whatever. *shakes head in dismay* Contractor painting floor was out. 

Thinking that maybe Flooring Guy would be able to take care of it, because after all, he is Flooring Guy. He smiled and said, "I've never painted a floor. But, sure! No problem" 

*Mistake! Red flag! Red flag!*

So, no. Flooring Guy did not paint the floor. I had him sand the old tar/glue & renovation crud that had built up. He got it down to a bare, smooth-as-a-baby's-behind state. Then we covered it in about a billion layers of paper for protection. Remodeling continued. 

Later, I thought maybe Painter Guy could do the floor, because after all, he is Painter Guy. He smiled and said, "I've never painted a floor. But, sure! No problem" 

*Mistake! Red flag! Red flag!* 

So, no. Painter Guy did not paint the floor. None of "my guys" could paint the floor. No one even knew how to paint a floor (or were just afraid). I couldn't trust any of them. I got seriously depressed. Then, I had a thought. I got excited...

Hand on hip, finger to the sky and in a voice worthy of a superhero, I bellow; "I'll do it myself!"

In hindsight, I think maybe I got "Pinterested" (to quote my sis-in-law). By grabbing inspiration and crafty awesomeness from Pinterest, one thinks one can accomplish anything in 2 days and have it turn out worthy of an  Architectural Digest photo shoot.  Not always possible. So, of course, a DIY Painted Floor weekend was easily within my grasp. Totally! No problem! I even had the brilliant idea of using different colors for each coat, so as it wears down over time, it'll look way awesome. Mom, being her super rad self, offered to help. (or maybe I begged, pleaded & bribed her with a lifetime spa membership. I'm not sure) My kitchen is just a big square, so taping off & painting shouldn't take too much time.  Right? Wrong! I forgot about my sweet new custom cabinets that we'd have to tape around. In, out, in, out, around the legs, under & in the cabinets... ugh. After pulling up all the protective paper, vacuuming & taping off, Mom and I had shimmied around on our bellies all day long. (knees, elbows, back = oh, the pain!)

Second layer. Oh, the beautiful white floor. Sooooooo amazingly awesome. Sad to cover it up, but I knew with my life, there was no way I'd be good at keeping it looking clean & pretty.  *sigh*

I wanted to add in a little bit of detail without going overboard with an all-over stencil pattern. What can I say, I'm a little fickle and I knew that I'd get tired of anything "big" I put down. So, I decided on a simple border stripe where we'd tape off the white and paint over with the turquoise. Fingers crossed that the tape would hold up to 2 coats rolling over it.

Commence OCD time! I became one with my Xacto. Serious measuring, penciling, measuring again. Taping, cutting, taping, cutting.

Below, you can see the tape peeking through the first layer of turquoise. 

It started puckering in spots, but overall there wasn't much touch-up needed later. Taking an extra half-day to touch-up? That was just me being OCD. Eventually, I had to say it was done.

All said and done, between taping time, drying time between coats, and fixing mistakes afterward, it took us about 7 days. All the paint was Rust-Oleum Deck Paint from Dunn Edwards. Layer 1: "Mint-o-licious". Layers 2 & 3: "Whisper". Layers 4 & 5: "Caribbean Cruise". Layer 6: clear polyurethane (professionally applied by Flooring Guy) .

Lots and lots and lots of effort that was well worth it in the end. Thanks Mom!!!!

.

Monthly Obsession: Rattan Chairs

This monthly obsession is brought to you by those fabulous rattan chairs that seem to be popping up everywhere these days. I mean... everywhere. I saw Ikea's version about a year ago. I was on my way to the registers - hell bent on getting out of the weekend crush ASAP {weekend Ikea = worst nightmare ever!}.

When I saw the display they had set up, it was like a cartoon scene - my body kept walking while my head stayed to savor the awesomeness that was that rattan chair. At the time, I was still in the thick of demo-ing my house & trying to figure out what fixtures to order. Decor, let alone patio furniture, was the last thing on my list. So, I left Ikea and kept that chair in the back of my head. I figured if it was out of store by the time I was ready, then it wasn't meant to be. Fast forward to now, and violá! Chairs. It just so happened that I snagged the last 2 on the shelf that morning. Score!

{I'm sure they had a billion more waiting in the back, but I felt lucky at the time}

I'll share pictures of my actual chairs a little later. 

top photo via Apartment Therapy

1. bamboo & rattan chair,  1stDibs
2. round chair, The Family Love Tree
3. hanging chair, Serena & Lily
4. Storsele chair, Ikea
5. rattan chair w/ cushion, One Kings Lane
6. red armchair, Meg Braff Designs

Mom's Garden: Caravaggio

 I put this arrangement together and immediately thought of Caravaggio. His paintings full of light and dark, mysterious shadows and amazingly velvety textures. This arrangement was from mid/late summer, but somehow it seems more like a wintery mood. Don't you think?

 Flowers used:
Rose "Prospero"
Rose "French Lace"
Monarda
Wild grape
Buddleja "Harlequin"
Gomphrena globosa "Fireworks"

.

Monthly Obsession: Moravian Star

This edition of

Monthly Obsession

is brought to you by the fabulously versatile

moravian star

pendant light. After ripping apart my little Spanish Revival house, I wanted to keep the interior looking relatively close to what you may have found in it when it was built in 1924... with a few classic updates, of course. When I looked up at my living room ceiling after all the

whipped cream

had been removed, I pictured awesome

moravian star

pendant lights. Those things have been around for so long, they're a classic. They can be found is so many variations, the star lights can be applied to pretty much any european-style house {spanish, moorish, german, english cottage, etc}. In true obsessive style, I scoured lighting stores and the interwebs for the perfect ones. Originally, I found really great ones from Rejuvenation that were the right size and in my budget. Unfortunately, by the time I went to buy them, they were discontinued. Sadness.

{something about the shade randomly falling off the light. Not good}

Just as I was getting disheartened, I somehow found lights from Ballard Designs. That catalog store isn't at all on my radar, like

ever

... but they had some nice ones that were also on super sale! Yessss! Done!

{see my bro & sis-in-law helping with the install below. I have amazingly 

awesome family

}

I pulled together a small collection of Moravian Stars for you to peruse below. {links below image} Enjoy!

Views of a Renovation: Jasco

Oh, Jasco®. A renovation/restorer/rehabber's best and worst friend. A necessity that is totally disgusting and toxic, but also totally amazingly awesome. I was adamant in keeping all my original door and window hardware. It just so happened that all of said hardware was covered in 2-6 layers of paint... often with big dried up drips hanging off. I invested in a big can of Jasco. Grabbed an old toothbrush, tweezers, pliers, rags and heavy duty gloves and got to work. Man, was it messy. The stuff ate right through my gloves and left my skin burning and tingling. So, {don't tell anyone} I tossed the gloves and continued barehanded {hence the tweezers & pliers}. I kept a bucket of water and a clean rag nearby in case I bumped into it with bare skin. It was much easier, but WARNING, do not do what I did. Use gloves. Use those huge, nuclear-tested, Homer Simpson gloves. Much safer.

 Finished product below! Viola! Amazingness.